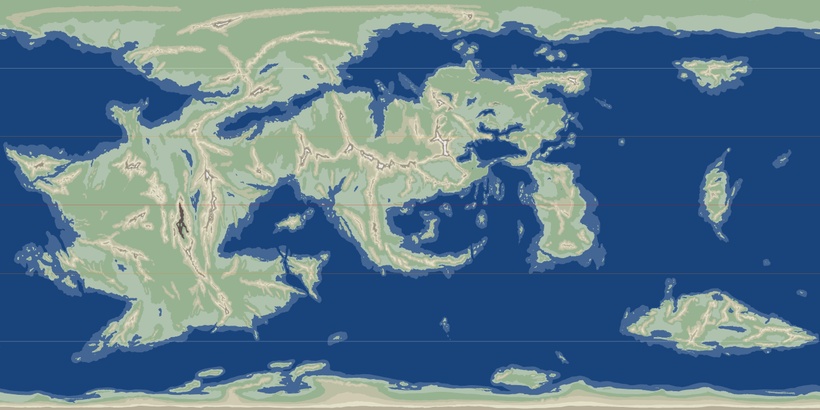
Time to put all the data from the previous steps to create an first true attempt at a planet visualization of Oerth. First I need to remind you that this is a only a first take on this and very much a work in progress, but it looked so damn cool that I could wait any longer and have to show what I'm working on.
I've used the elevation and climate model to create a rough sketch of what the planet actually looks like in summer, and it is summer in both hemispheres which is not natural but practical for this purpose. The ocean depths are only rudimentary done in Photoshop and need a lot of more work, as well as the the mountain colors, too many black ones. Despite all these shortcomings, I think is a stunning image!

This equirectangular map can serve well as a start of making a more detailed image of the planet, both its landmasses and the oceans.
Thank you so much for all the support that makes it possible for me to spend serious amount of time on this project!!!! 🙂
A revamp of my Patreon will be announced soon, I'm working out the details, with new more defined and ambitious goals and a slight adjustment of the tiers.

First a heartfelt thank you, for all the wonderful and encouraging feedback you have given me for the first Oerth Continent post!!
This second instalment will be a look at the climate of Oerth and the Flanaess using a slightly simplified version of the Köppen Climate Classification. For this part of the project I've had help from a friend of mine who has working with oceanography and she has helped me explain how the oceans of the Earth works and what could be the case for a planet like Oerth. I've also leaned on my weather knowledge from having been a pilot and especially my long distance glider piloting which relies heavily on understanding weather patterns. Wikipedia and Artifexian's YouTube channel have been very helpful is applying this knowledge onto a fantasy world. I'm not an expert on climate matters, but I think I have enough understanding of the topic and knowledge of the Greyhawk setting to feel qualified to create a model of the planet that can be both useful and inspiring for Greyhawk fans who want to expand their campaign horizons.
A key guiding principle for this project is to try and create a planetary model that can work as a canvas for both the published stories we know and love, and an inspiration and help in creating new stories from other parts of the planet Oerth.
Below is an image showing what the climate looks like for Earth.

and here is Oerth for comparison (using a slightly simplified set of classes)

Several differences are striking, Oerth has way more deserts of both the hot and cold variety. This is due to mainly the larger single continent and a larger axial tilt. Larger continents tend to heat up away from oceans and the increased axial tilt exaggerates the tropics and poles, and on Oerth the Tropical Circles are at 30 deg N and S instead of the 23 degrees on Earth. The same goes for tropical rainforests and should have been the case for savannahs, but due to the dryer larger continent, ocean currents and mountains the savannahs are not as widespread as the could have been.
Here is the classes and the temperature and precipitation characteristics

Before we go into the details a brief discussion on climate science and how I have used it in my Oerth model. Climate are influenced by a myriad of things but since this is a fantasy world we can simplify things to aspects that can be more useful for our games. I've chosen geography, meaning where on the planet a region is located, ocean currents and general wind patterns.
Geographic location drill down to three general climate regions, the tropics between 30 deg N to 30 deg S, temperate between 30-60 deg N and S respectively, and the polar regions 60-90 deg N and S respectively as illustrated below.

The actual climate varies with airflow, ocean currents, humidity, and in some cases magic or other fantasy factors climatologists in the real world don't have to deal with. I've tried to keep them to a minimum and there are only one clear case of this and that is the Bright Desert, and even there it is only marginal as we will se when we get there on this journey.
Next up is to take a look at the global ocean currents and how it distributes heat and cold around the planet. Overall Oerth have a 57.56% land and 40.98% ocean (including major lakes and inland seas). Oerth's larger land area is all due to the landmass covering the north pole, apart from this difference the water land ratio are similar.

Due to planet rotation and size ocean currents form large rotating gyres, and on an earth-like planet (size and rotation) it will for two gyres N and S of the equator respectively. The can be likened to gigantic cogwheels that move the water around in the large oceans, where they form and how large they are are due continental layout. If we look at the Solnor Ocean north of the equator we have a clockwise gyre that carries warm water and humid water up along the eastern coast of the Flanaess making it both warmer and wetter way far north than would otherwise been the case.
Temperatures of ocean currents are relative, meaning they bring in water that are warmer or colder in relation to the average temperature of the area. So cold currents in the tropics can be way warmer than warm currents in the arctics. Warm currents generally makes areas more humid as well as warmer. Reversely cold currents, makes an area dryer as well as cooler. Cold currents in the tropics can mean desert or savannahs instead of rainforests. Warm currents in the arctic can mean oceanic climate instead of sub arctic boreal climate or even polar tundra.
How much difference currents make also depends a lot of the wind patterns, are they warm or cold on-shore or off-shore winds. Warm winds are generally a bit more humid than cold, and on-shore winds much more humid that off-shore winds. The combination of all this plus elevation, latitude and water presence determines the climate.

Winds are affected by planet rotation and temperature, and form bands of similar airflow across different latitudes. This is very obvious on giant planets like Jupiter and Saturn, but the same mechanics apply to smaller planets as well. The bands of winds mixes heat and cold across the planet, bringing warm from the tropics into temperate areas, and cold from the arctic south into temperate areas. These wind patterns are persistent enough to create typical weathers in different latitudes. Low pressure and humid along the equator. High pressure, dry areas north and south if of this create deserts on the edges of the tropics. The temperate zones are dominated by low pressure, humid and windy conditions, and the arctic see mostly high pressure cold and dry conditions.
I've done my best to try and take all this into account creating this climate model of Oerth. It gives a rich and varied planet to explore with lots of contrast and every climate zone we have on earth is present in significant areas on several locations.

The Flanaess has a rich climate diversity, from frozen arctic in the Black Ice, Yatils, Crystalmists and Corusk Mounatins. A band of boreal subartic from the Barbarian lands in the west to the Thillonrian in the east. Cold steppes stretches from west of the Fler river to the northern shores of the Nyr Dyv, and are again forming a large part of the North Province. A temperate humid continental climate reigns over lands from the Baklunish coasts in the west though Ket and much of the central western Flanaess. East of the grat lakes and the steppes are yet another large stretch of humid continental temperate climate. Each of the coastal areas of this temperate belt have wet humid conditions giving rise to rainforest on the north western slopes of the Yatils in Ekbir and showers the islands and cost of the Solnor with rain and warm winters. This is an effect not from magic but warm currents from the south and humid warm winds. It is only a local phenomenon in Ekbir but the much warmer currents on the Solnor warms up and humidifies and much larger area from Hepmonaland to the Sea Barons.
The lands around the Azure range from humid subtropic in the west and south to Mediterranean in the north and east giving it excellent living conditions, among the best of the planet in fact, so now wonder that it it has a large population and developed countries. Mediterranean, subtropics and warmer part of the temperate areas are the most prosperous climates to live in for humans and similar creatures dependent on agriculture. The Sheldomar Valley and Flamni basin are prime examples of good areas for empires to develop in.
Most of the Baklunish west are dry steppes that get progressively hotter and dryer the further south you get, which give much less support for civilisation to grow. There is a bad along the cost of the Dramidj and the western slopes of the Yatils all the way to Ket that the Baklunish have been taken advantage of and make a good living in. The far western end of the Dramidj is another example of good climate conditions for humans (and similar creatures) to thrive, giving DM's plenty of lands to develop civilisations in.
Apart from the Flanaess and the western Dramidj I see four main areas for bred baskets, the north western Oerik hava long coast and a peninsula with excellent conditions for settled life. The south western Oerik have a long subtropic coast and temperate lands next to it with a wet oceanic part in the south, like the Baklunish coast in reverse. The south eastern cost of Western Oerik is also a great place to settle with a drier Mediterranean coast and temperate interior. The northern end ready for your Eryptian civilization, with deserts as well as a fertile coast and south. The large southern continent gives Oerth a huge expanse of land in the temperate zone with great potential for agriculture, plus a cold wild southern interior and coast.
Western Oerik gives Oerth several deserts, a huge expanse of tropical savannah, some of its tallest mountains ranges and the biggest canyon on the planet. The mountains and inland seas gives it a wide range of climates in a close proximity, from glaciers, tundra, boreal forest to hot deserts in only a few days journey. Like a big version of California, Central Asia and Africa all in one.
There are lots more to look at when it comes to Oerth and climate, this is just a first look and I'm intrigued by all the possibilities!

One thing most Greyhawk fans have in common is a curiosity of what the rest of the planet looks like, with that said, there are probably few issues that will bring up more difference then what the rest of Oerth looks like. So it is with great trepidation I have taken on the task of modeling the planet.

My approach is to try be inclusive and make room for lots of things, while still try and pay homage to existing work that have been done before. From the little map in the Glossography, the Dragon Annual #1 map and numerous fan made maps have taken turns at tackling the "cowhide", it is hard to hide the fact that the DA1 map looks like an ugly cowhide. My approach is to look at all these maps as I would look at real world ancient or medieval maps , a work of art that vaguely resembles the lands it is trying to map. I kept the basic shape but broke up the coastlines and added lots of detail to try and obfuscate as much as possible.
Overall I'm fairly happy with it at this stage, the cowhide is half hidden and broken-up by mountains and other features. Geographically it is a very interesting continental layout with pleasantly habitable areas sprinkled out in several places, and a lot of contrasting areas with plenty of adventuring possibilities. The Flanaess for example stretches from the arctic to the tropics with at least a sliver of every type of climate zone (more on that in the next post in this series) to make it extra interesting.

Hepmonaland just south of the Flanaess is the only other continent that is reasonably well mapped in the Scarlet Brotherhood. I've added some more small islands around it to make it a bit more realistic. Some further refinement of the coastlines are probably called for, they are a bit too sterile for my taste. It is a midsize hot continent that spans the equator into a dry south creating an African like environment but on a smaller scale.

South Central Oerik features Oerth second biggest Mountain range that divides the central continent into three areas, the Baklunish basin that we are already familiar with the eastern part that we call the Baklunish West and southerly regions. The curved southern peninsula really needed to be broken up, the banana shape was terrible. It might need more work before its good enough, w'll see how it holds up in the discussion.

A very interesting region that according to DA1 is one with the polar region preventing the Dramidj Ocean from forming a northern global maritime route. I've kept this land bridge creating a pathway for polar creatures reaching south and vice versa, a good place for mammoth hunting!
Due to the larger axial tilt of 30 degrees temperate areas get squished between bigger poles and more expansive tropics so land real estate at these latitudes are very important and a land bridge stops the cold currents from circulating and staying cold. Keeping the land bridge adds to the land and a shallow enclosed sea keep the water a bit warmer giving the area a boost.

Western Oerik, Oerth's big place, and that is giving it a blend of features we recognize from both Afrika and Asia and more. It is defined in the east by Oerth equivalent of the Andes, a north south range separating it from the Central Oerik. To make this was lump of land more interesting I've added a rift valley west of the eastern divide creating a couple of huge inland lakes, that might be fresh, salty or just dried out salt flats. West of this is a second range of highlands with the biggest rift on the planet, a it more than four times the size of the Rift Canyon. This is an huge dry interior worthy of a Dark Sun like campaign, or a place for Dragons to come to nest or wait for their eternal rest. Several massive mountain rages in this part gives it climate and terrain variety with lots of interesting opportunities beyond dry hot deserts.
The western central part forms a tropical plain with Oerth's largest tropical plains. The northern end reaches beyond the plain with a coast and peninsula that I'm sure some sort of creatures have settled!
Western Oerik reaches al the way to the southern arctic circle adding the was variety of different biomes on this end of the continent.

In the middle of the Solnor Ocean I've placed a small continent as an homage to Empyrea, Frank Mentzer's part of the planet he was given the right to develop. It is a tropical place with jungle and rainforests, but I added several mountain ranges and a really tall massive in the center to provide a number of different biomes to make it interesting.

A Great Southern continent is said to exist, and if you look carefully at DA1 map you can see it hinted at bottom right. To add to the precious temperate resources of Oerth, and to make room for Empyrea, I placed it touching the southern polar circle giving it a god range of possible biodiversity.

The South Pole looks a bit too star-shaped due to Map 2 Globe's quick render. This needs to be mapped properly as a separate project. I'm thinking of keeping a center mountain, might be cool with a huge volcano jutting out of the ice, and maybe it is an opening to a hollow Oerth.... 😉
This was a short presentation of my thoughts and approach to mapping Oerth. This is still a work in progress, and to be able to evaluated it better I'm working on a climate map using Köppen Classifications.

You can create the globe at https://www.maptoglobe.com/
Use this image for texture: https://www.dropbox.com/s/clf737d1kbbh2qc/Equrectangular.jpg?dl=0
and this for heightmap: https://www.dropbox.com/s/6fljvnyzc3hv097/Oerth%20Continental%20Height%20%20-%2021%20blur2.jpg?dl=0
Tonight's Legends & Lore Show on LordGosumba - Twitch will be about the Flan, Druidism and the Old Faith, and I was going to bring up some of my take on the topic by trying to look at it from the Flan side of things so I wrote a short history piece, Greyhawk history seen from the Flan perspective.
The Flan, Flanaess seen from the Old Side
This is an attempt to write a short version of the history seen from the Flan perspective, it is normally told by the "victorious" Oerdian side.
The Flan have always been a people of faith, faith in themselves, their gods and their ability to defend themselves. When the Aerdy arrived in the Flanaess all that was going to be challenged and despite what most historians in the Flanaess have told you, that struggle is still not settled, far from it.
The faith of the Flan lives up to its name The Old Faith, because it roots are old, very old. Their devotion for Beory, their planet, Pelor their sun, Rao their wisdom and all the life Obad-Hai nurtured is legendary. Druids have guarded both the Flan people and all other life in their lands, in harmony with the Olves, Noniz and even Dwur since the day of the Ur-Flan. Existence isn’t always harmonious and sometimes interests collide, moral codes and tempers vary and in some cases faith in what is good and well wains. For the Flan this was seen as part of the natural cycle of life and death, growth and decay, and for this they worshipped another set of powers to help them through the dark times and to make sure that the Flan would always prevail in the end, no matter what.
This was the Dark Faith, a cabal of powers ready to bring even the worst aspects of the world into submission. Those among the Flan that was too greedy, prone to violence or just sinister enough to be shunned by their peers had in Flan society an outlet that made them useful and important, they were the ultimate guardians of the Flan, called to perform the duties no one else was morally or otherwise quipped to carry out, they were The Horned Ones, guardians of the Flan and the Dark Faith. When discussion, negotiation and even threats were not enough the Horned Ones heard the calling. The Dark Faith had a menagerie of powers just like the Old Faith, and to everyone knowledgeable of the Flanaess a familiar set it is, Incabulos to get them ready for their doom, Nerull to handle their death, Orcus to bring them beyond death, Zuggtmoy to get rid of even the worst remains, add in the demon Graz’zt to give the Flan motivation, strength and lust to make more Flan and a number of other demon lords including Demogorgon and Jubilex as a service to the most wicked parts of nature. This assured the Horned Ones would make the blood freeze in anyone who dared to opposed them and the Flan cause. A cabal of Dark Druids served these masters to keep the enemies of the Flan, both internal and external, at bay. When the age of the cataclysms entered, they were slowly and reluctantly called in by whispers among the Flan. Everyone knew the toll that came with calling for the Horned Ones, but as times became dire enough, the Horned Ones had to show what they were made of. First to rise was a young star of the Dark Faith that had mastered both the art of magic and later undeath, Vecna. He created a strong Flan bulwark, and nothing stood in his way to make the Flan the undisputed rulers of all their ancient lands and more. That was the credo of the times until he was betrayed by Kas and destroyed. The Flan was dealt a severe blow that would diminish them for an age. The good-hearted Flan adherents tried to negotiate with the other people of the Flanaess, both old and new and with some success. Together with the Olve and Noniz they managed to establish a state run by an order of Rao priests that have recruited among both newcomers and Flan for some time. Veluna became a haven for the Old as well as new faiths.
With the rise of the Malachite Throne, the Horned Ones took refuge in the north away from the onslaught of newcomers with new ideas, gods and enemies of the old. They bided their time and planned to strike at the heart of the new power that was hellbent in diminishing Flan traditions as well as the lords and ladies of the Flan courts in what has always been Flan lands.
The time came when even their best knights of the Great Kingdom became decadent and weak. A well-executed deception made the top echelon of the once valiant Knight Protectors the most powerful servants of the Horned Ones so far unleashed in the Flanaess, but to be sure of victory the Dark Order also added in the worst they could muster from their dark lords most wicked realms, Arendagrost, Maw of the Abyss. In this atrocious act they inadvertently helped the very power they were set to destroy, the fear that flew across the lands was so strong that it united everyone against them even the Druids and people of the brotherly Flan faith they were supposed to protect. A posse led by Sir Benedor defeated Arendagrost, assisted by every priest, mage and warrior brave enough to face it, including the druid brethren from the Adri, Grandwood Thelwood and surrounding lands. The direct strike at Rauxes was a failure but the Death Knights is a serious threat even to this day and the Malachite Throne never regained its former glory.
The western lands of the Aerdy gained their independence which also meant that they gained strength, both in political and military terms but also culturally and spiritually. The Old Faith and customs of the Flan was now seen as a thing of the past in large part of the world. The Dark Faith leaders had to find refuge far into the north, desperate for a new champion, someone strong, ruthless and ready to take the fight to the enemy. Graz’zt took on the mission to create a new hero for the Flan, and in the Witch Iggwilv he found the right might, blood and cunning for the mission. He willingly sacrificed some of his essence in return for Iggwilv’s eternal hatred as she was ravaged by the lust of Graz’zt. From this union of deception, violence and wrath came a son, a cambion that Graz’zt gave his advisor Lord Vuron to torture and indoctrinate from the very beginning to be filled of hatred and cunning and never to never give up. To make young Iuz good start he was given a small fief in a secure northly area with the title the Old One to made sure every Flan understood his ambitions. Young Iuz wasn’t taken seriously by anyone except the Dark Ones who had high hopes for the fledgling cambion who soon started to acquire some notoriety for cruelty and success in taking over neighboring realms.
After a promising start Iuz was captured by the enemy alongside other powers, both Flan and of other allegiances, and held in Zagyg’s Castle Greyhawk. To try and protect the holdings of their captured hero the Dark Ones scrambled and set up a protective state in the city of Molag run by the Hierarchs of the Horned Society, a name no Flan could mistake. Thanks to secret play by the Dark Ones agents, Iuz and the other power was later freed and once again ready to continue their important work to secure the future power of the Flan.
Iuz first offensive move after regaining his freedom was together with Zuggtmoy, to create a diversion in the south to try and make his nearby enemies look the other way while he was preparing his forces at home for his coming attacks. The Horned Society had played out its role and was abolished with wild scenes to give the impression that there was serious internal strife, which was not the case, the Horned Ones was just changing tactics back to the way they had conducted their grizzly business for centuries, in secret. This is when the plans of the Dark Faith derailed, when Iuz created a diversion using an impression of the god Vatun to lure the Stonefists to attack the very heart of Flan power, Tehn. What lays behind Iuz move few if any outside the court in Dorakaa knows, but in an instant the hero of the Flan had become the enemy. Flan power and culture was dealt one of the worst defeats in Flan history by a protegee devised to lead them to victory. The ranks of the Flan were in true disarray for years, and it gave Iuz the chance to keep advancing despite the lack of support from his old peers.
It took until the late 580’s CY for him to lose his momentum and new alliances could be formed to counter the threat. Again, it was the good side of the Old Faith who showed the way by building on the old, the alliances with their Rao brethren of Veluna and the Olve. With the diplomatic power of Mitrik and the newfound strength of the Olve, King Belvor and the new regent in Rel Mord was all aboard in joining forces to counter the threat of the Old One. A secret partner in this alliance is none other than the Horned Ones out to revenge the fall of Tehn. War and politics are strange and now fly the banners of Pelor, Rao, in the form of the Heart and the Shield against the Old One backed in secret by the Horned Ones of the Dark Faith is now hunting one of their own.
This part of the map have been in need of some TLC for a long time, and in order for changes to be included this year we have to figure out what it should look like. As usual the sources are sketchy this far away from the central Flanaess so a fair bit of guess work has to go into this.
For this project have have used the latitude map from the Glossography

Mike bridges excellent map that you ca find on his blog here: http://greyhawkery.blogspot.com/2011/06/new-greyhawk-map-south-seas.html
The Infamous Best of Dragon Map Oerth map:

From all this and maps from Savage Tide and some other fan creations, have started to work crate my own Oerth model. Here is the current version that is still in its early stages:

Azure modeled along all these sources could look something like the title image.
On the Glossography map there is what looks like a large island that I completely missed, but Mike didn't and its about time to get it on the map. I'll kept the small islands north of it and added in the surrounding islands from Mike's map. I hope its not too many Pirate Isles, it is good for adventuring to have plenty of hideouts to discover!
The Mist Kingdom have been squeezed in a bit but I hope they have enough waters around them. Ruja has been moved just south of the Mist Kingdom chain as of the Glossography map. Auxaul Ilses have been moved SW a bit to make room for all the extra stuff added, but its not too far from the Glossography map I hope.
The island that started it all the Isle of Dread I moved a bit north compared to Mikes map in order for it to be in a remote location in the center of the Vohun Ocean.
It is a bit thrilling to venture so far away from Greyhawk, but is also very interesting, requiring plenty of compromise. What do you guys think?
After a long series of technical and behind the scenes post in this series it’s now time to start turning all that work into the first stage of the final map, giving the terrain proper realistic texturing. Nature is both endlessly varied and yet still abide by rules and predictable patterns, and to replicate that using fractals and clever programming is not easy. The SPLAT map is the first stage of that defining what time of Biome each area is a part of the next step is to define each Biome and then blend the Biomes according to the SPLAT map data. We must turn the SPLAT map below:

Into this:

Done right a fantasy landscape can look totally believable, yet specially created to suit the stories that are meant to be played out in it. The trick is to define each Biome properly, and have the Biomes appear where they realistically would do so. The example above only has a few Biomes, to types of grass, one short and barren and one longer and richer, bogs, lakes, rivers, reeds, sand, rocks and gravel. I've used the selection tools that was the focus of the last post in this series to create the SLPAT map, then edited the Splat map in Photoshop to improve on the things that my fractal programming didn't do a good job with. Artistic input in the form of painting using a stylus is also a great way to work in some of the special details from written sources or needed for the stories. This approach also makes it easy to adjust things, make a test render using half resolution and go bac to Photoshop and edit the Splat map fix issues and then render again.

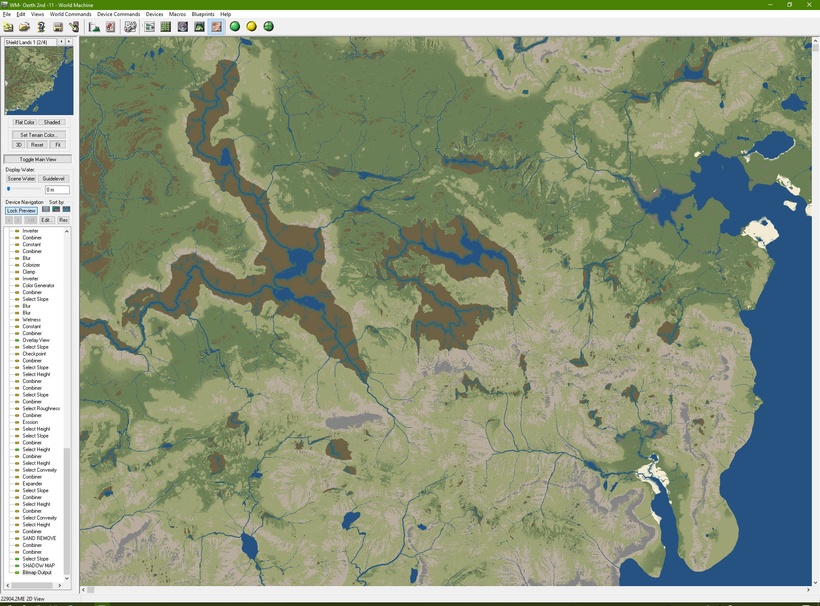
Let’s look at a couple of the Biomes, starting with the grasses that are the light and slightly darker green on the SPAT map. Most of Shield Lands are covered, in my view in either a more barren type of open sparsely overgrown open plains, with short hardier grass and occasional low bushes and other hardy forms of sage. Higher up the grasses are gradually replaced by mosses and hardier forms of ground hugging plants. The darker green are more fertile lands, plenty of grasses, herbs and blooming flowers forming rich meadows, bushes and trees are still rare due to both lack of consistent and ample rainfall, gracing by wild and domestic animals. This is not really the case anymore, the war has decimated and scared off both domestic and wild animals, but the standoff and population decline have made wild animals move back in again to some degree. If the hostilities continue the area might see more bushes and trees, or more fires and devastation that depends on the outcome of your campaign!
Here it is important to state that it is exceedingly difficult to model temperate wild plains, that is a habitat that is almost complete gone on Earth today, replaced by industrial agriculture that have turned the landscape into a gigantic production facility. This requires studying the few little remnants left, creativity and some guess work to come up with something that is useful from a gaming perspective, and inspirational.
Landscapes have a history, and that needs to be considered to make them believable. Shield Lands the way I see it has a surprising amount of landscape variety and history, I've assumed that this landscape is a mix of mostly old and work down terrain made up of a mixture of sedimentary and harder rock covered by a fair bit of soil in most places. Here and there are the scars of old vulcanism in the form of rugged basalt features, which will get more and more common the closer we get to the majestic White Plume Mountain. I also assumed that it used to be wetter in recent geological history and used to have way more lakes and bigger rivers. The lakes are now mostly turned into bogs, with small lakes in the center of some of them and a lot of them partly or fully overgrown. This makes the landscape dotted with valleys with a very flat bottom and totally flat areas dotted around in the otherwise covered in rounded low hills. The Southern Coast feature a set of moderate hills, that I have named the Serion Hills in my campaign, with rounded granite peaks rising into about 3000 feet in a few places. Not much to speak of compared to the majestic mountains elsewhere in the Flanaess but still high enough to be different than the surrounding lowlands.

Above is an example that even the most boring parts of a game setting has interesting features and stories to tell, even if it is only a green hex on the earlier setting maps. I have found two “islands” surrounded by bogs which seems great places for a keep or a small settlement in easy to defend places.
It needs to be stated that all the screenshots in this post are raw renders and should be seen as work in progress and not finished maps, one more refinement of the SLPAT is needed, vegetation added and a final post render polish in Photoshop. That said I’m proud of the results at this stage.
Below is the World Machine setup for the Short Grass Biome.

It uses two Colorizer Device that uses the colors from images of grasslands with variation driven by distorted fractals. Mixing them using elevation, flow, slope and convexity, and then tweaking the colors according to elevation.
The Long Grass is similar setup but with different fractals color tweaks and elevation parameters.

Bogs are simpler, a colorizer taking its values from bog images, a fractal to drive variation, and a color selection to insert grass texture on the green areas.

And here is what the result can look like with the help of a bit of manual splat map editing.

With only an edit or two of the splat map for each area you can re-use the same World Machine texturing file for a whole region that share the same characteristics. Then make gradual tweaks as you move into new areas.
Almost every aspect of terrain creation is involves masks, the feature that either hides or reveals things. Mask are a familiar feature to all Photoshop users as that greyscale add-on to layers, and in it comes in many variants in World Machine, GAEA, Blender, Vue and every other 3D tool I know of. It is a simple greyscale bitmap that uses its brightness value to reveal things and lack of it to hide whatever it is associated with. This is a very powerful feature that can be used in a surprising number of ways.

Bit depth are the key feature of masks, they normally come in 1-bit (black and white), 8-bit, 16-bit and the whopper 32-bit. In most programs like Photoshop for example, you get the bit depth defined in the settings for the file you are working on, but in terrain generating tools you might be required to assign a bit depth to masks either at creation or export. Size difference is the main reason to go low, or the fact that you don't need nuances, at times a clear cut boundary is what you need so even a low value works. Some uses of masks requires very high precision so even a 16-bit mask might not be enough, this is especially true when it comes to heightmaps. 8-bit heightmaps comes with a "Minecraft warning", the low precision creates unnatural terracing across the landscape. 16-bit heightmaps are good enough for most use cases, but if you want to be able to zoom in and create detail maps in the future, or cover large differences in terrain elevation 32-bits are a good precaution. For my Greyhawk project both the ability to create more detailed local maps and cover big elevation differences are vital so a 32-bit height map is needed.

More is not always better, and Photoshop can balk at 32-bit mode due to the sheer size of files and when it comes to color edits the human eye have a hard time seeing the difference between even 8-bit and 16-bit color. Few computer monitors offer more than 10-bit color depth anyway so for texture editing 8-bit masks usually do the job well enough. Inside 3D applications and for terrain creation things are another matter, and selection tools in these mask use the internal bit depth of the application which is usually 32-bit so no need to change things. Exporting masks and heightmaps (which is technically just another mask) is when you have to decide on bit depth.
World Machine and GAEA comes with a large number of Selection Tools, they are the standard way you create masks. You can Select for Elevation, Direction, Roughness, Convexity, Slope, Wetness, Color, Hue, Brightness, Saturation. The last ones are color related and are a nifty way to place trees or tufts of grass in wetlands for example.

Most Selection tools comes with a Falloff setting that lets you tweak the edge of a selection, sharp and abrupt or smooth and diffuse. Enough falloff is critical to have with you, especially when you export for use in Photoshop editing later. You can always sharpen a mask afterwards in Photoshop, but blurring sharp edges usually work less well, and re-renders take lots of times, and can also give you different outcomes, making results not matching.

Selections often need to be done in combinations like slope of a certain degree above a certain elevation, and the result of that selection can be refined by erosion masks to only show within the erosion flow areas. This is how I defined areas of boulders accumulating beneath certain slopes, areas they would have naturally have done so in the real world. The number of possible combinations are literary endless, an Erosion Device creates 4 new masks as part of the process and with secondary selections like Roughness and Convexity you can create all the mask data needed for a truly natural looking terrain with an endless amount of incredible detail.
Masks are also a key part of every step of the process from the mixing of fractals and erosion impact, in biome allocation, texturing relies heavily on the use of masks as do the touch up editing afterwards. Getting used to and mastering the "grey side" of digital imaging is a vital part of digital terrain creation which makes us Greyhawk fans well prepared!
Next part of this series will be a deep dive back into the world of color with texturing.
Sorry for the lack of updates, I've had back problems that kept me away from my desk for a bit but now I'm back again at almost full capacity.
Working hard on prepping for my Gary Con Seminar this Friday @6:00pm CDT on LordGosumba - Twitch channel.
Here is are the topics I plan to cover:
2021 A new generation maps meet the old:
The old map will gradually be replaced
The Atlas, the Easy to Use Version
Flanaess 2021 Updates
Map Responsibly
Limits of Fantasy Cartography
Canvas for Our Stories
Foundations For TTRPG's - Maps - Stories - Rules
Visualizing the World of Greyhawk
Data Driven, Editable, Multi Use
An Example - Hunold Island

Terrain Creation - Lakes & Rivers - Splat Map - Texturing - Vegetation - Touch up
My Campaign


World Simulation - Dynamic - Local - Detailed - Gritty - Uncertain
Oerth - the Home of our Setting
What is out there?
I hope to see you in Twitch Friday, and tomorrow Wednesday for the Legends & Lore Show at 8pm EDT at the https://www.twitch.tv/lordgosumba Twitch channel.
A while ago I posted a first look at the refreshed Settlement Symbols, here comes a follow-up with the other icons. No additions that I felt the need to include, instead my efforts have been to try and improve the ones I think needs an overhaul or replacement. The goal is to make them easier to identify, especially at low resolution, while maintaining a stylistic consistency. I’m also hoping I have kept some of the connection back to the classic Greyhawk maps of old, expanding and refining rather than totally replacing.
First out are the Bridge, Ford and Ferry symbols. Got rid of the yellow circle in the back and just filled in the shape with yellow, reserving the circle for towns. This is something I have done consistently for the non-town symbols. The old ferry map has gotten a new boat that is a bit more streamlined and simplified. The Ford symbol is something I have been using on my campaign map for a while, and I thought it is time for it to get a revision and become an official symbol.

They are on the small side compared to the larger settlement symbols, the size differences need to be tweaked and tested when they go on an actual map. MY maps will come in a wide range of scales in the future, which requires different symbol sets depending on scale. On larger scale maps bigger settlements will be large enough to have their outlines shown rather than being represented by a symbol, more on that in a future post.
Next up are the Mine symbol, and it too have had its yellow circle replaced with an outline to make it more distinguished. We will see how well this work out in real tests.

I created an oasis symbol in the shape of a simple palm for the Midgard maps and like it a lot better than the old double palms, so I hope a yellow outlined version can settle well in Greyhawk.

The Site symbols are something that I seem to be the inventor of, have not seen a generic site symbol on other fantasy maps. I felt the need for a symbol for all sorts of places that had some sort of significance but where no one lived, from magical to religious places. The old symbols where a bit haphazard and cluttered, the new have kept the Neolithic style but much simpler.

The last one to be renewed are the Dungeon or cave symbol. A staple of fantasy that I now feel belong to the others in a much better way.
If you can come up with other symbols you want to see, have I missed any obvious ones?
I will put together some test with these and we can see if they work or need to b tweaked further. When we have these done, I will work on the demi-human and humanoid versions.
Back to the techie side of mapping again for a first look at texturing, the art, and craft of coloring computer generated objects, in this case terrain. As always when it comes to CG terrain creation nothing is straight forward, so texturing will be done in stages. Texturing is in many ways the best part of my work; you get to see that the awkward looking mess you have been working on for a long time suddenly start coming to life. It is extremely rewarding, and I often get lost in details and dream of who and what lives there and the events taking place. Making sure that stories set in the area I am working on have a suitable location, is a part of my checklist all the way from early terrain generation phase to the end of texturing.
The primary purpose of texturing is to make the terrain look realistic, inspiring and give detailed information of what a certain area consists of, rock, sand, march grass or forested for example. For a map that is going to be used in a single way in a specific medium like printed on a poster, then you create a texture with the right resolution sharp enough to retain all the details in the final print. Printing needs can vary from small cards to wallpaper for a living room wall, all with different needs for resolution and detail.
RPG needs in the future will span a much wider need than prints, VTT’s, PDF’s, Geographical Information Systems and Game Engines are the ones I am aware of now, but more will come I am sure. When you do a project of this magnitude a key part is to make the most to assure usability as possible and make the results customizable, prolonging their life. For example, forests can grow in places and be cut down in others, seasons come and go, and demons might invade, or magic calamities affect the lands. In all these cases it is good to know what the terrain is made of and what grows there. That way you can turn all the vegetation in an area brown, black, or grey to indicate a blight, or change the color of deciduous trees to indicate fall but leave the pines and other evergreen trees the same color for your seasonal maps. This can speed up editing and improve the result a lot but providing the right data in the right format.
Area data is mostly stored using masks, a greyscale image with brighter pixels indicating a presence of something. This is great when you want precision, like for elevation using heightmaps. Another way of storing areal data is to use a Splat Map, it is a color image using each of its RGB channels to store data of some variable. Some image formats like PNG also comes with a transparency channel with means you can store four masks in the same file, improving storage efficiency and handling. For other use cases you do not need precision, instead you need to know which of several variables a particular area has, so you can use the color of that pixel to indicate a binary value. This way you can replace lots of masks with one image and save lots of storage and by using the appropriate colors also make them directly usable. Below is the set of colors I have used for my Shield Lands Splat maps.

By using various selection tools in World Machine, you can decide what type of terrain goes where. Remember I wrote about lakes and rivers in an earlier post, the result of that work was a mask that is now the source for which pixels will be water. Selection can be straight forward, like above or below a certain elevation, to extraordinarily complex like erosion flow zones phasing between 90 to 270 degrees and with and not steeper than 55 degrees for example. The variations are practically endless, but the key is to try and figure out where trees or grass grow turn that into rules and select for it. Below is an example of what a splat map in progress can look like.
And with added shading to make it more understandable.

It is still very much a work in progress, trees and bushes are still to be added and just like with the rivers an artistic step using Photoshop is needed to polish it up and remove some ugly bits that pop up here and there. To assist in the Photoshop editing the same masks that was used in the water editing can be used in this step as well. Since we are not messing with the elevation the terrain stays consistent and we can eliminate changes to the terrain that so often comes from changing the size and placement of the render area, which means you can create a smaller render area to quickly preview it in full resolution. When you work with elevation fractals the previews can be very misleading, by getting all the terrain building done in the first phase we now have a much more stable and predictable environment to work in getting the details right.
Splat Maps also have a key function as a coordinator between formats, for example to make sure that the large format texture matches the details generated in a game engine gets textures and models of trees and bushes in the right place and of the right type. Another example is in GIS you can use the Splat Map to create matching vector shapes and styles that are in the right place.
By using colors that are reasonably natural even the plat map can be understood and useful, but it is as a template for creating the final textures it shines. Looking at it even in this unfinished state I like it and combine it with the elevation, and we can start to see the final landscape emerge.


Next installment in this series will be creating the final textures using World Machine, Photoshop, and the Splat Map.
Thank you again for all your support!!


